Step 1. Go to http://maps.google.com
Step 2. Go to 'mymaps' tab and create a map, with a pushpin marking your location
Step 3. Hit the 'View in Google Earth' button and save the .kml file
Step 4. Load the .kml file into Google Earth
Step 5. Save the new .kml file from Google Earth (this one is cleaner)
(an alternative to the above 5 steps would be to use http://www.addressfix.com/ (I've just discovered that useful tool!)
Step 6. Edit the kml file in your favourite text editor making good use of the tags and links you can put in there.
Here is a nice example of a .kml file which indicates the kinds of things you can do with the <description> tag:
http://www.seo-expert-services.co.uk/seo-expert-services-london.kml and in use here.
Step 7. Put a link to the kml file in the sitemap.xml file, like this...
<url>
<loc>http://www.userexperiencedesign.co.uk/userexperiencedesigncambridge.kml</loc>
<priority>0.5</priority>
<changefreq>daily</changefreq>
</url>
Refs:
http://weblog.millionpieces.nl/2007/4/how-to-get-your-information-into-google-maps
Some more advanced KML examples.
Tuesday, January 29, 2008

Monday, January 21, 2008
Sunday, January 20, 2008
Google Webmaster Tools
Google has some pretty handy Google Webmaster Tools - Dashboard to use to show you how it sees your website.
You can check your robots.txt file here and your sitemap and loads of other stuff.
You can check your robots.txt file here and your sitemap and loads of other stuff.
Add a robots.txt page to tell search engines like google which pages to leave out of the index
There is a good summary of the robots.txt file here: The Web Robots Pages.
These days, you can add a reference to the location of your sitemap here too.
These days, you can add a reference to the location of your sitemap here too.
Adding a Sitemap
An interesting Google article asks - What is a Sitemap file and why should I have one?
It is worth adding one to tell google all about your website. It is also worth adding a robots.txt file if you have parts of your website that you would like Google to avoid, or indeed, would like to make really sure Google finds your sitemap!
It is worth adding one to tell google all about your website. It is also worth adding a robots.txt file if you have parts of your website that you would like Google to avoid, or indeed, would like to make really sure Google finds your sitemap!
Tuesday, January 08, 2008
base href does not work for php includes !! (and what to do about it)
Base href is very handy for organizing relative addressing on a website. You may, for example, be working on a project for a client with a directory structure like this:
www.userexperiencedesign.co.uk/projects/cambridge_motorcycles
The 'normal' root of this would typically be www.userexperiencedesign.co.uk but if you want the /cambridge_motorcycles part to be the root, you could define a base href so that all the sub-directories under it would refer to that as root instead. Like this...
This works GREAT for images and general relative addressing.
I was stumped for a while, trying to figure out why this didn't work for PHP includes. PHP experts would not be so stumped. PHP is handled server side, so the base href in the document is not used. After a lot of head scratching I figured that you could define an equivalent for base href to be used by the PHP includes.
First, you need to define the variable in PHP. Mine is like this...
Then, when you call the include file you do it like this...
This gives us a neat way to fake up a base href equivalent for PHP includes. Neat!
If you are an efficiency expert you might worry about how many server calls are made by the PHP includes and whether, when defining $root, you should give the whole path or something relative. My sites are very small so this is not a big deal for me but if anyone wants to leave comments on efficiency (or anything else) I am always happy to learn!
www.userexperiencedesign.co.uk/projects/cambridge_motorcycles
The 'normal' root of this would typically be www.userexperiencedesign.co.uk but if you want the /cambridge_motorcycles part to be the root, you could define a base href so that all the sub-directories under it would refer to that as root instead. Like this...
<base href="http://www.userexperiencedesign.co.uk/projects/cambridge_motorcycles/\" />
This works GREAT for images and general relative addressing.
I was stumped for a while, trying to figure out why this didn't work for PHP includes. PHP experts would not be so stumped. PHP is handled server side, so the base href in the document is not used. After a lot of head scratching I figured that you could define an equivalent for base href to be used by the PHP includes.
First, you need to define the variable in PHP. Mine is like this...
<?php $root="http://www.userexperiencedesign.co.uk/projects/cambridge_motorcycles/\"; ?>
Then, when you call the include file you do it like this...
<?php include ($root."include/header.html\"); ?>
This gives us a neat way to fake up a base href equivalent for PHP includes. Neat!
If you are an efficiency expert you might worry about how many server calls are made by the PHP includes and whether, when defining $root, you should give the whole path or something relative. My sites are very small so this is not a big deal for me but if anyone wants to leave comments on efficiency (or anything else) I am always happy to learn!
Sunday, December 09, 2007
embedd a flickr slideshow set to allow good control of display order
I always seem to struggle with embedding flickr photos into my web pages and I'm not sure why really. If you want a lot of control of the order your photos will display, you should create a flickr set and put the photos in there and order them.
Then you'll need to use your flickr user id number (see idgettr.com) and the set id number for your photos (shown in the URL when you view the set).
Then replace the user_id and set_id in the following bit of code, showing my Impington Swimming Club set.
Created with flickrSLiDR.
Then you'll need to use your flickr user id number (see idgettr.com) and the set id number for your photos (shown in the URL when you view the set).
Then replace the user_id and set_id in the following bit of code, showing my Impington Swimming Club set.
<iframe align=\"center\" src=\"http://www.flickr.com/slideShow/index.gne?group_id=&user_id=79364623@N00
&set_id=72157594394097360\" frameBorder=\"0\" width=\"500\" height=\"500\" scrolling=\"no\"></iframe><br/><small>Created with  <a href=\"http://flickrslidr.com\" title=\"flickrSLiDR\">flickrSLiDR</a>.</small>
Created with flickrSLiDR.
Sunday, December 02, 2007
Aardvark Maps - An easy way to add pushpins to Google Maps
Aardvark Map - a simple tool for building a map for your website with a few pushpins on it. A bit like this...
Saturday, November 24, 2007
Can I embed Google Maps into my website or blog?
Can I embed Google Maps into my website or blog?
Here's how to embed a google map in a website - handy!
Here's how to embed a google map in a website - handy!
Wednesday, November 21, 2007
Putting code into a blogger post
It can be a bit of a faff to put code onto a blogger post. I have just found a nifty utility to convert it into the right format to make it easy.
Check out http://www.accessify.com/tools-and-wizards/developer-tools/quick-escape/.
This adds the escape characters you need to put code onto a blog. You can put the results between <pre></pre> tags.
Check out http://www.accessify.com/tools-and-wizards/developer-tools/quick-escape/.
This adds the escape characters you need to put code onto a blog. You can put the results between <pre></pre> tags.
How to hide your email address from spammers if you have to put it on the internet
When you put an email address on the internet, computer programs called 'spam robots' will find it by trawling over all the web pages they can find. Over the years these 'spam robots' have become more sophisticated but they can be thwarted to some degree. There are various ways to thwart them, one of which is to make your email address into an image which has no code equivalent that can be read by the programs. This is a bit nasty from an accessibility perspective - how do people with disabilities access this information?
Another way to do it is to assemble the email address with a snippet of javascript. Whilst a computer program could interpret this ('parse it'), it probably won't bother since there are plenty of other email addresses out there which are not protected at all and they may as well sell Viagra to those people.
Here is how my email address is protected. You will see how it appears at the end bottom of my website, www.userexperiencedesign.co.uk.
The code looks like this. It's a little more complicated looking than I would like because I have had to ensure that it is still valid XHTML. The comments in the code reference the sources of information I used in coming up with this.
You should note that this is NOT a foolproof way of ensuring you don't get spam but it should reduce the amount you get.
<!-- This Javascript hides an email address from spam robots -->
<!-- See The JavaScript Source!! http://javascript.internet.com -->
<!-- I got this to validate following advice from here http://www.geocities.com/wb7crk/ -->
<!--The 'noscript' tag provides alternative contact info for people with Javascript switched off-->
<div>
<script type=\"text/javascript\">
<!--//<![CDATA[
var user = \"carl.myhill\";
var site = \"userexperiencedesign.co.uk\";
document.write(\"<a href=\\\"mailto:\" + user + \"@\" + site + \"\\\" accesskey=\\\"9\\\" \\>\" + user + \"@\" + site + \"<\\/a> <em>[9]</em> \"); //]]>-->
</script>
<noscript>
<p><em>Contact carl.myhill at userexperiencedesign.co.uk</em></p>
</noscript>
</div>
NOTE: This bit of code also activates accesskey 9 for your email address. This is the standard (in the UK government at least) accesskey for 'feedback' and allows users to hit Alt+9 to send you an email instead of needing to navigate to the link.
Another way to do it is to assemble the email address with a snippet of javascript. Whilst a computer program could interpret this ('parse it'), it probably won't bother since there are plenty of other email addresses out there which are not protected at all and they may as well sell Viagra to those people.
Here is how my email address is protected. You will see how it appears at the end bottom of my website, www.userexperiencedesign.co.uk.
The code looks like this. It's a little more complicated looking than I would like because I have had to ensure that it is still valid XHTML. The comments in the code reference the sources of information I used in coming up with this.
You should note that this is NOT a foolproof way of ensuring you don't get spam but it should reduce the amount you get.
<!-- This Javascript hides an email address from spam robots -->
<!-- See The JavaScript Source!! http://javascript.internet.com -->
<!-- I got this to validate following advice from here http://www.geocities.com/wb7crk/ -->
<!--The 'noscript' tag provides alternative contact info for people with Javascript switched off-->
<div>
<script type=\"text/javascript\">
<!--//<![CDATA[
var user = \"carl.myhill\";
var site = \"userexperiencedesign.co.uk\";
document.write(\"<a href=\\\"mailto:\" + user + \"@\" + site + \"\\\" accesskey=\\\"9\\\" \\>\" + user + \"@\" + site + \"<\\/a> <em>[9]</em> \"); //]]>-->
</script>
<noscript>
<p><em>Contact carl.myhill at userexperiencedesign.co.uk</em></p>
</noscript>
</div>
NOTE: This bit of code also activates accesskey 9 for your email address. This is the standard (in the UK government at least) accesskey for 'feedback' and allows users to hit Alt+9 to send you an email instead of needing to navigate to the link.
Thursday, November 15, 2007
Test your web design in different browsers - Browsershots
Test your web design in different browsers - Browsershots
What a GREAT tool for testing how your website looks in multiple different browsers. Inspired!!!! Browsercam.com looks good too but is expensive, this one is free!
This post was extremely helpful...
http://www.sitepoint.com/forums/showthread.php?threadid=462563
What a GREAT tool for testing how your website looks in multiple different browsers. Inspired!!!! Browsercam.com looks good too but is expensive, this one is free!
This post was extremely helpful...
http://www.sitepoint.com/forums/showthread.php?threadid=462563
Wednesday, November 14, 2007
base href and named anchors
This is just a rough note for now. I have always wanted to use the base href tag. With this you can have structure like this...
maindomain
maindomain\projects
maindomain\projects\bikeshop
maindomain\projects\bikeshop\map
maindomain\projects\bikeshop\about
Well, normally the root you are working with is maindomain but if you want to temporarily have your bikeshop project sitting in some sub folders you can and you can specify the base ref to acheive it, like this...
maindomain\projects\bikeshop\index.html
<head>
<base href="http://www.maindomain.com/projects/bikeshop">
And now any sub folders can be set up with relative links and will all look at the baseref. SWEET
One thing is not sweet. When you are in this file...
maindomain\projects\bikeshop\about\index.html
...and you jump to a named hyperlink within that document, you jump to the base href instead. Which is a complete pain.
After many hours of surfing it seems that good old PHP has an easy answer for us...
<p class="skiplink"><a class="skiplink" href="<?php echo $_SERVER['REQUEST_URI']; ?>#top" accesskey="2" >Skip over navigation</a></p>
This server request returns the actual URL of the document and sticks it into the page, so, your named hyperlink within the page is more fully qualified.
This probably makes no sense but it is very handy to me to write it down right now!
maindomain
maindomain\projects
maindomain\projects\bikeshop
maindomain\projects\bikeshop\map
maindomain\projects\bikeshop\about
Well, normally the root you are working with is maindomain but if you want to temporarily have your bikeshop project sitting in some sub folders you can and you can specify the base ref to acheive it, like this...
maindomain\projects\bikeshop\index.html
<head>
<base href="http://www.maindomain.com/projects/bikeshop">
And now any sub folders can be set up with relative links and will all look at the baseref. SWEET
One thing is not sweet. When you are in this file...
maindomain\projects\bikeshop\about\index.html
...and you jump to a named hyperlink within that document, you jump to the base href instead. Which is a complete pain.
After many hours of surfing it seems that good old PHP has an easy answer for us...
<p class="skiplink"><a class="skiplink" href="<?php echo $_SERVER['REQUEST_URI']; ?>#top" accesskey="2" >Skip over navigation</a></p>
This server request returns the actual URL of the document and sticks it into the page, so, your named hyperlink within the page is more fully qualified.
This probably makes no sense but it is very handy to me to write it down right now!
Wednesday, February 07, 2007
Decent & Free Usability Tool - usability.gov
This is worth a look.
Free Web usability tool - usability.gov (ZDNet, 5 Jan 2007) - "The Web Communications
Division in the U.S. Department of Health and Human Services’ Office of
the Assistant Secretary for Public Affairs, in collaboration with "many
federal agencies," offers a comprehensive, easy-to-use,
no-cost, online how-to guide for developing usable and useful Websites."
Source: UPA MONTHLY - FEBRUARY 2007 - The monthly newsletter of the Usability Professionals' Association
Free Web usability tool - usability.gov (ZDNet, 5 Jan 2007) - "The Web Communications
Division in the U.S. Department of Health and Human Services’ Office of
the Assistant Secretary for Public Affairs, in collaboration with "many
federal agencies," offers a comprehensive, easy-to-use,
no-cost, online how-to guide for developing usable and useful Websites."
Source: UPA MONTHLY - FEBRUARY 2007 - The monthly newsletter of the Usability Professionals' Association
Tuesday, January 30, 2007
Lesson 13: How to put blogger content on your webpage or How to set up a webpage that people can simply edit using blogger
I distinctly remember spending a full 12 hours trying to figure this out only for my friend Paul Warwicker to give me the key to this in about a minute. Sadly I didn't record the detailed steps but perhaps this outline will be helpful. If not, please let me know and I'll update this.
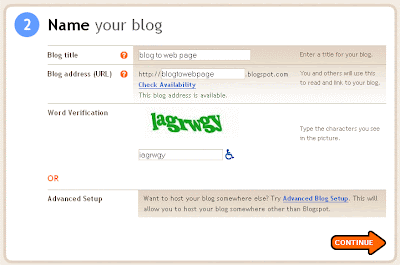
The first thing you need to do is to create a blog with blogger.com. First you will need to create an account. The second step is to name your blog. Before you finish this, click the 'Advanced Blog Setup' option, since you will be hosting your blog content somewhere else (in your own web space)
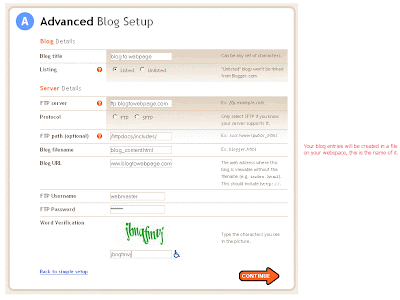
In the advanced setup you can add your websites FTP details, FTP path you want to use and the name of the file you want blogger to create and send there for you (in this case I've asked for it to be called 'blog_content.html'.
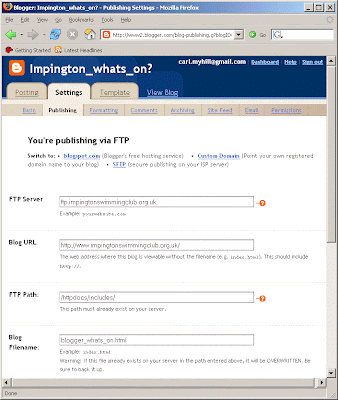
I am a big fan of looking at lots of examples. I fabricated the one above but the following settings are the ones we use on our swimming club website www.impingtonswimmingclub.org.uk, the first page of which is powered by blogger content.
After you have finished with this page you will be asked to choose a template. You will not be using it really so just pick anything (such as 'son of moto' in green) and then you are done.
The next thing you may want to do is decide who you will allow to edit the blog. Go into the Blog 'Settings' tab and choose 'Permissions' and then 'Add Authors' to enter the email addresses of people who you would like to edit the blog.
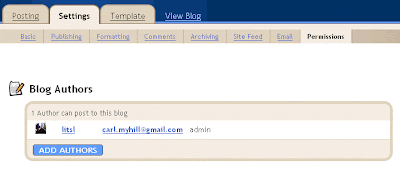
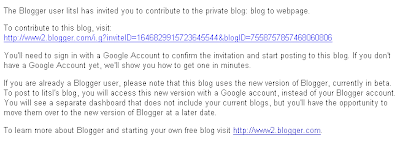
The people you invite will get an email like the one below. They will need to sign up for a google account in order to post to the blog but google accounts are GREAT! Not a hassle.
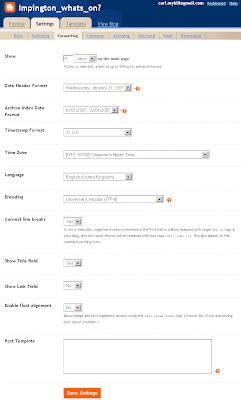
You may now like to explore other 'formatting' options from the settings page. Depending on how active your page becomes you may need to tune this a bit to decide how many entries you want to post to your webpage. Here are the settings we currently use on the Impington Swimming Club website.
Now you need to edit your webpage HTML to read in this new file blogger is going to send (via FTP) to your webspace. Again, here is an example from the Impington Swimming Club website. This is pretty simple stuff though it uses 1 line of PHP.

You will notice that the 'Main' content of the webpage is kept within a <div> block (that's not really important here). You'll see a heading <h2> and then 1 line of PHP. Look carefully at the syntax of that line, it's easy to make a mistake if you are unfamiliar with PHP. The most important thing to notice here is that the PHP Include Path may look different than you are used to when refering to different web pages on your webspace (I think they call this 'fully resolved' but I'm afraid I don't remember all of the nuances of this but I think my webspace provider 34sp helped me out with it).
When this works, what happens is that the line of the PHP include will be replaced with the actual contents of the file from blogger, which in the impington example is called, "blogger_whats_on.html". Here's a snippet of our what that current file looks like. It's just a snippet of clean HTML produced by blogger. Heading tags and everything else will adopt the style you already have set up for your website, perhaps in your CSS file.

So, that's that.
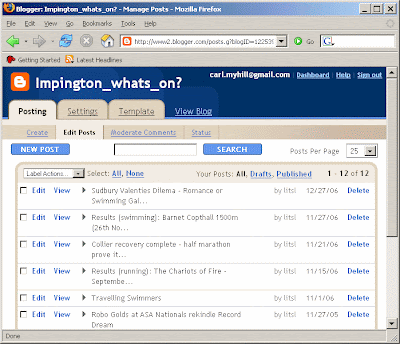
When your prospective webpage editors want to change the blogger served content of your webpage they simply go into blogger and blog away. To control the order of the posts editors may like to play around with the posting dates. It's not very elegant but it's pretty simple. Here's what the editing interface looks like...
If people want to add photos to their blogger posts, they can do this in the usual way (see some of the 'lessons' below).
OK, this 'lesson' has been written largely from memory. Please do let me know if you have any trouble making sense of it.
First create a blogger.com account and a new blog
The first thing you need to do is to create a blog with blogger.com. First you will need to create an account. The second step is to name your blog. Before you finish this, click the 'Advanced Blog Setup' option, since you will be hosting your blog content somewhere else (in your own web space)

In the advanced setup you can add your websites FTP details, FTP path you want to use and the name of the file you want blogger to create and send there for you (in this case I've asked for it to be called 'blog_content.html'.

I am a big fan of looking at lots of examples. I fabricated the one above but the following settings are the ones we use on our swimming club website www.impingtonswimmingclub.org.uk, the first page of which is powered by blogger content.

After you have finished with this page you will be asked to choose a template. You will not be using it really so just pick anything (such as 'son of moto' in green) and then you are done.
Invite the people you want to be able to edit the blogger served webpage
The next thing you may want to do is decide who you will allow to edit the blog. Go into the Blog 'Settings' tab and choose 'Permissions' and then 'Add Authors' to enter the email addresses of people who you would like to edit the blog.

The people you invite will get an email like the one below. They will need to sign up for a google account in order to post to the blog but google accounts are GREAT! Not a hassle.

Explore formatting options - how many posts do you want to show on the webpage?
You may now like to explore other 'formatting' options from the settings page. Depending on how active your page becomes you may need to tune this a bit to decide how many entries you want to post to your webpage. Here are the settings we currently use on the Impington Swimming Club website.

Inserting your blogger file into your webpage using a PHP Include
Now you need to edit your webpage HTML to read in this new file blogger is going to send (via FTP) to your webspace. Again, here is an example from the Impington Swimming Club website. This is pretty simple stuff though it uses 1 line of PHP.

You will notice that the 'Main' content of the webpage is kept within a <div> block (that's not really important here). You'll see a heading <h2> and then 1 line of PHP. Look carefully at the syntax of that line, it's easy to make a mistake if you are unfamiliar with PHP. The most important thing to notice here is that the PHP Include Path may look different than you are used to when refering to different web pages on your webspace (I think they call this 'fully resolved' but I'm afraid I don't remember all of the nuances of this but I think my webspace provider 34sp helped me out with it).
When this works, what happens is that the line of the PHP include will be replaced with the actual contents of the file from blogger, which in the impington example is called, "blogger_whats_on.html". Here's a snippet of our what that current file looks like. It's just a snippet of clean HTML produced by blogger. Heading tags and everything else will adopt the style you already have set up for your website, perhaps in your CSS file.

So, that's that.
Editing the webpage via the blogger interface
When your prospective webpage editors want to change the blogger served content of your webpage they simply go into blogger and blog away. To control the order of the posts editors may like to play around with the posting dates. It's not very elegant but it's pretty simple. Here's what the editing interface looks like...

If people want to add photos to their blogger posts, they can do this in the usual way (see some of the 'lessons' below).
Feedback please
OK, this 'lesson' has been written largely from memory. Please do let me know if you have any trouble making sense of it.
Monday, December 04, 2006
Lesson 12: How to leave space beneath floating block elements
If you have trouble with floating block elements having no defined height there is a neat solution to it.

This picture is inside a block which is floated left. Any text that follows will just sit next to it.
If you want the text after the image to come out beneath it you don't want to add loads of <BR /> tags to artificially line things up. A more certain and clean approach to giving the element some height is as follows:
Here is the picture again...
...but with the extra empty div below it to give it some fake height.
This picture is inside a block which is floated left. Any text that follows will just sit next to it.
If you want the text after the image to come out beneath it you don't want to add loads of <BR /> tags to artificially line things up. A more certain and clean approach to giving the element some height is as follows:
<div style="clear:both"></div>
Here is the picture again...
...but with the extra empty div below it to give it some fake height.
Lesson 11: How to centre (center!) your Flickr Slideshow
I don't know much about iframes but I figure they behave like block elements. If you put a <div> wrapper around it and center that, you should be in business.
Take a look at this example from the Impington Swimming Club website's results page. The entry from 26th November has a centered flickr slideshow and the one from September 2006 has a standard left justified one. All of these entries are fed from Blogger.
Here's the code...
Here's how it looks but note that, you will probably not notice much difference looking at the code on this blog since the margins are controlled very well by other aspects of this page's template style sheet. Best to take a look at the Impington website. Actually, I've made the width 450 instead of 500 now so it may show up.
Take a look at this example from the Impington Swimming Club website's results page. The entry from 26th November has a centered flickr slideshow and the one from September 2006 has a standard left justified one. All of these entries are fed from Blogger.
Here's the code...
<div align="center">
<iframe align=center src=http://www.flickr.com/slideShow/index.gne?tags=isc_barnet1500_06 frameBorder=0 width=450 scrolling=no height=500></iframe>
</div>
Here's how it looks but note that, you will probably not notice much difference looking at the code on this blog since the margins are controlled very well by other aspects of this page's template style sheet. Best to take a look at the Impington website. Actually, I've made the width 450 instead of 500 now so it may show up.
Thursday, November 30, 2006
Lesson 10: How to put a Flickr slideshow on to your website or blog
The excellent photo hosting service Flickr now allows you to put a slideshow on your website or blog. It uses Flash but most people seem to have that these days.
This code searches flickr for any images tagged with both 'black bear' and 'wildlife' and puts them into the following slideshow.
If you make up your own unique Flickr tags you can quickly put a slideshow of your own images on the web or on a blog. If you tell your friends what the tag is, they can also add photos to your slideshow if they have a Flickr account.
Alternatively you can make the Slideshow viewer just look for photos from a particular Flickr user. You can look up your flickr user_ID with idgettr.com. In the following code snippet and slideshow you can see only MY images tagged 'black bear' and 'wildlife'.
<iframe src="http://www.flickr.com/slideShow/index.gne?tags=black bear, wildlife" align="middle" frameborder="0" height="500" scrolling="no" width="500"></iframe>This code searches flickr for any images tagged with both 'black bear' and 'wildlife' and puts them into the following slideshow.
If you make up your own unique Flickr tags you can quickly put a slideshow of your own images on the web or on a blog. If you tell your friends what the tag is, they can also add photos to your slideshow if they have a Flickr account.
Alternatively you can make the Slideshow viewer just look for photos from a particular Flickr user. You can look up your flickr user_ID with idgettr.com. In the following code snippet and slideshow you can see only MY images tagged 'black bear' and 'wildlife'.
<iframe src="http://www.flickr.com/slideShow/index.gne?user_id=79364623@N00&tags=black bear, wildlife" align="middle" frameborder="0" height="500" scrolling="no" width="500"></iframe>Monday, March 06, 2006
Lesson 9: Writing Valid Mark-Up Code (html or xhtml)
Why bother with writing valid HTML or XHTML?
1. Improved cross browser compatibility
Browsers like Internet Explorer and Firefox have a relaxed attitude to the quality of your mark-up code. If you forget to close a tag, well, they will usually let you off and make assumptions about what you meant to do. This kindness is actually extreme cruelty in disguise because each browser takes a different relaxed attitude to your mark-up code. This means that if you are developing a website on Internet Explorer, everything may look fine and dandy, but when you try it on Firefox, it may well be very wrong.
So much for kindness.
The solution to many cross-browser problems comes from ensuring you code is valid, which you can do with some free tools, which teach you along the way too.
2. Better Google hits
It seems likely that Google and other search engines prefer valid code. This is unproven but their indexes need to walk over your code, so writing valid code will help them out and will probably be rewarded.
3. Better Accessibility
Valid code is inherently more accessible than non-valid code. To build an accessible website it's not enough to valid code but it is a very good start.
DOCTYPE DTD Declaration
The first step towards writing valid mark-up code is to declare the kind of code you are writing. HTML and XHTML come in different flavours and have different specifications. By stating which one you are following, your mark-up can be validated against the specification.
Here is the basic template you will need (taken from the w3c site), just so you can see where the DOCTYPE fits in...
<!DOCTYPE html PUBLIC "-//W3C//DTD XHTML 1.0 Strict//EN"
        "http://www.w3.org/TR/xhtml1/DTD/xhtml1-strict.dtd">
<html xmlns="http://www.w3.org/1999/xhtml" xml:lang="en" lang="en">

<head>

 <title>An XHTML 1.0 Strict standard template</title>
 <meta http-equiv="content-type"
  content="text/html;charset=utf-8" />
 <meta http-equiv="Content-Style-Type" content="text/css" />
</head>

<body>

     <p>... Your HTML content here ...</p>

</body>
</html>
I generally use this xhtml 1.0 strict definition. This is a little tougher than html but not too much when you get into the swing of it. If you want to use xhtml, you have the choice of 'strict' or 'transitional'. I usually strive for strict but at times I give up and switch over to transitional. As I understand it, transitional allows you to use some markup which is really out-of-date with the strict interpretation of the standard but not in a really serious way.
Strict and Transitional DOCTYPES for XHTML are...
<!DOCTYPE html PUBLIC "-//W3C//DTD XHTML 1.0 Strict//EN"
   "http://www.w3.org/TR/xhtml1/DTD/xhtml1-strict.dtd">
<!DOCTYPE html PUBLIC "-//W3C//DTD XHTML 1.0 Transitional//EN"
   "http://www.w3.org/TR/xhtml1/DTD/xhtml1-transitional.dtd">
A perfectly acceptable alternative approach would be to stick with html. If you do that, here are your strict and transitional choices...
<!DOCTYPE html PUBLIC "-//W3C//DTD HTML 4.01//EN"
   "http://www.w3.org/TR/html4/strict.dtd">
<!DOCTYPE html PUBLIC "-//W3C//DTD HTML 4.01 Transitional//EN"
   "http://www.w3.org/TR/html4/loose.dtd">
The W3C website has more information on Document Type Definitions (DTDs) or DOCTYPES for short
Validation Tools
When you have declared the specification your html is written against, you are ready to validate it. The W3C has an excellent markup validator. Why not try it and see how you get on. The validator gives you quite a bit of detail on any problems it finds and is quite a nice way of learning by doing.
Changing from HTML to XHTML - tips
There is not a whole lot of difference between XHTML and HTML, the former is just a little more rigourous. Here are a few tips to get you started in making the transition:
XHTML tags are always lower case
Don't mix case in your tags, just stick to lower case.
Open and Close all tags
All tags must now be closed. Mostly you already know you should close tags like <p> with </p> but there are some tricky ones:
For <br> you should now write the open and close within the same tag, like this <br />.
Same applies for <img src="photo.jpg" />.
Ampersand &
Sometimes when you paste a lump of code from somewhere else, you'll see some '&' in there. You will need to change every one of them to & instead.
Update bold and italic tags
Instead of <b> for bold and <i> for italic; <strong> is now preferred for bold and <em> for italic (emphasis). Often these will give you the same result by default, and you can use a style sheet to change their appearance too.
Subscribe to:
Posts (Atom)
